public Site root files
What files should you uploaded in the public site root directory?
There are two basic files you should have - favicon.ico and robots.txt. You can also have files that can be required by some web analytics or payment systems. We will discuss only the two basic files.
Robots.txt
When this txt file is inserted to your root directory it will give you control of what pages can or cannot be indexed by the search engines. You can also exclude a certain search engine from being able to search your site at all. For websites with multiple subdomains, each subdomain must have its own robots.txt file. If example.com had a robots.txt file but a.example.com did not, the rules that would apply for example.com would not apply to a.example.com.
There are many web generators but you can create your own robots.txt by following these steps:
- Open your favorite text editor and create a robots.txt file
- Type in one of the following examples, that fits your needs best:
User-agent: *
Disallow: /
this will disallow ALL search engines to search your site. In this manner your entire site is locked and the search engines have no access to it. The star that you insert for User-agent means that all search engines are concerned and subject to what you disallow them to view.
User-agent: *
Disallow:
By putting nothing for Disallow you are providing access to all search engines, along with the permission to index your entire website.
User-agent: Google
Disallow:
In this case Google's search engine will be able to search your entire website.
User-agent: Bad search engine
Disallow: /
In this case you will disallow Bad search engine to search your website.
User-agent: *
Disallow: /private/
In this case the search engines are not to allowed to index the page with path /private/.
- Save the file
- Upload by following the steps bellow.
Favicon.ico
Browsers that support a tabbed document interface typically show a page's favicon next to the page's title on the tab. Some programs allow the user to select an icon of their own from the hard drive and associate it with a website. A web designer can create such an icon as a 16×16 pixel square icon.
Review the current files in the root directory of the public site
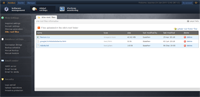
The architect can easily browse and manage already uploaded site root files using the “Site root files” module.
To review them, you need to:
- Log in to the WordFrame Integra Core Administration
- Click on the "Architect" tab in the upper left corner
- Click on the "Global settings" menu in the main navigation bar
- Click on the "Site root files" link in the "Web Settings" section on the left of the screen.
Upload a file in root folder
- Log in to the WordFrame Integra Core Administration
- Click on the "Architect" tab in the upper left corner
- Click on the "Global settings" menu in the main navigation bar
- Click on the "Site root files" link in the "Web Settings" section on the left of the screen.
- Click on the “upload root folder files” link in the upper right corner of the grid
- Click on the “Browse” button and choose a file you want to upload
- Click on the “Upload” button to start the uploading process
Last edited by Boz Zashev on 29 Sep 2010 | Rev. 5 |
This page is
public |
Views: 1
Comments:
0 |
Filed under:
Global settings |
Tags: