public User accounts import
To create a single user account you need to do:
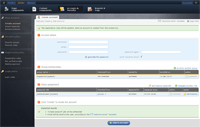
- Log in to the WordFrame Integra Core Administration
- Click on the "Builder" tab in the upper left corner
- Click on the "Accounts & Security" menu in the main navigation bar
- Click on the "Create account" link in the "User accounts" section on the left of the screen
- Fill in the account details
- the username, the email and the password will be verified according to the corresponding registration rules
- If you want a "welcome email" to be send to the user once the account is created, check the corresponding checkbox
- Manage the account's group memberships
- the initial groups list includes all the groups that have the auto-enroll option enabled.
- to enroll to account to another group, click on "enroll to another group" link and a pop up window will appear with a list of groups. Click the corresponding "select" link for your choice, which will add this group to the list and close the popup window.
- to remove the accounts enrollment to a group just click the corresponding "recall" link
- Manage the account's roles assignment
- the initial roles list is generated according to the initial groups' roles assignment plus the default "registered users" role
- to assign another role to the account, click on "delegate another role" link and a pop up window will appear with a list of roles. Click the corresponding "select" link for your choice, which will add this role to the list and close the popup window.
- to remove the accounts assignment to a role just click the corresponding "remove" link
- at any moment you can review the aggregated list of permissions that will be granted to the account according to the current roles listed in the grid
- Press "Create account" button to trigger the account creation background job
Last edited by nadia on 27 Oct 2010 | Rev. 1 |
This page is
public |
Views: 1
Comments:
0 |
Filed under:
root |
Tags: