public Manage a system backup schedule plan
To do manage the details of an existing backup schedule plan, you need to follow these steps:
- Log in to the WordFrame Integra Core Administration
- Click on the "Architect" tab in the upper left corner
- Click on the "Global settings" menu in the main navigation bar
- Click on “Backup schedule” link in the "Database Settings" section on the left of the screen
- Click on “manage” link that corresponds to the backup plan you need to manage
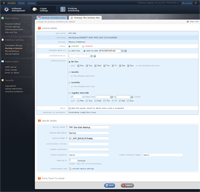
- Alter the backup schedule plan details:
- plan name (read-only) – the name of the plan
- job name (read-only) – how background jobs created by this schedule can be recognized
- status – if disabled the plan will stop scheduling jobs immediately. Already scheduled background jobs will not be influenced
- schedule starts on – enter the date when the schedule plan will start scheduling background jobs
- schedule ends on – enter the date when the schedule plan will stop scheduling background jobs
- schedule period – how often the plan will reoccur
- you have several options:
- daily
- weekly
- monthly
- regular intervals – if you choose this options, the system allows you to define the exact time interval when the schedule plan will start
- alert – if you check this option, an email alert will be send to the system email, each time the plan was executed
- scheduled by applications – it shows what application creates this schedule plan
- backup name – enter the name of the backup
- backup description – type a brief description of the backup
- backup folder – enter the folder where backup files will be stored
- authentication domain – enter the accounts domain
- system username – type your server account username
- system password – type twice your server account password
- keep up to – shows the number of backups, you want to be kept performed by this schedule plan
- Click on “validate backup settings”. If everything is OK with the backup settings, you should see a popup with a message “Backup folder exists and access to create file is granted”. If there is another message you should check the account details.
- Retype your backup account passwords as the backup validation will clear them
- Press the “Save” button
Last edited by Boz Zashev on 29 Sep 2010 | Rev. 2 |
This page is
public |
Views: 1
Comments:
0 |
Filed under:
Global settings |
Tags: